As an Amazon Associate I earn from qualifying purchases. This page may contain affiliate links.
Stock Honda ATV tires are the factory-spec rubber your machine was designed around, and knowing their exact size, load rating and tread pattern lets you replace them with confidence. This guide shows you how to identify the original tires on your Honda, read the sidewall markings, decide whether to stay with stock or upgrade, and avoid the mistakes that cause handling problems, premature wear and rim damage. By the end, you will have a clear buying checklist you can take to the shop or the online cart.
Why Stock Tire Specs Matter on a Honda ATV
Honda engineers each ATV model around a specific tire diameter, width, aspect ratio and wheel offset. Those numbers affect gearing, ground clearance, steering effort, brake performance and how the suspension travels. A tire that is noticeably taller or wider than stock changes the effective final drive ratio, which can make the throttle feel softer and the speedometer read incorrectly. Stock sizing is therefore the baseline for safe handling, not just a suggestion.
Shopping for one? See our guide: Side by Side Atv Utv (2026): Which Should You Choose?.
Staying close to factory specifications also protects the rest of the machine. Fender clearance, brake caliper clearance and front-end steering geometry are all designed around the original footprint. If you go much larger, you may rub the fenders at full lock or stress CV joints and wheel bearings. If you go smaller, you may lose ground clearance and change the rolling resistance enough to notice in the throttle response.
How to Identify Your Stock Honda ATV Tires
Before you shop, confirm exactly what your machine came with. Model years and trim levels can differ, and some Honda models were offered with different tire sizes for front and rear positions.
Step 1: Read the Sidewall
Look at the sidewall of the existing tire. You will see a designation such as AT21x7-10 or 25×8-12. The first number is the overall tire height (or diameter) in inches, the second is the section width in inches, and the last number is the rim diameter in inches. Some tires use metric sizing, such as 205/50R10, where the first number is width in millimeters and the second is aspect ratio. Record both front and rear sizes separately.
Step 2: Check the Load Index and Ply Rating
Next to the size, you will find a load index (a number such as 41 or 45) and sometimes a speed rating or ply rating like 6PR or 4PR. The load index tells you the maximum weight each tire can carry at its rated pressure. Your replacement should meet or exceed the original load index. ATVs often carry passengers, gear and cargo racks, so do not reduce this number to save a few pounds of weight or a small amount of money.
Step 3: Confirm Rim Diameter and Bolt Pattern
The rim diameter must match the wheel exactly. Tires are not interchangeable across rim sizes. Measure the bead seat of an existing wheel if you are unsure, and confirm the bolt pattern and offset if you are changing wheels as well as tires.
Step 4: Consult the Owner’s Manual or Dealer
Honda’s owner’s manual lists the factory tire size and recommended cold inflation pressures for your model. Your dealer’s parts department can confirm the size for your specific model year using the VIN. Keep that record in your garage notes so you have it for the next replacement.
Checklist: What to Gather Before You Buy
- Model name, model year and VIN
- Front and rear tire sizes from the sidewall
- Load index and ply rating of the existing tires
- Rim diameter and wheel bolt pattern
- Recommended cold tire pressures from the owner’s manual
- Typical riding terrain (sand, mud, rocks, hardpack or mixed)
- Whether you carry passengers or heavy cargo regularly
Choosing Between Stock and Upgraded Tires
Most riders can stay with stock sizing and pick a different tread pattern that suits their terrain. Others want to change size for better clearance or flotation. The table below summarizes the trade-offs in general terms.
| Option | Typical Benefit | Main Trade-Off |
|---|---|---|
| Same size, same tread | Predictable handling, correct gearing and speedometer accuracy | Limited improvement in traction or wear |
| Same size, aggressive tread | Better grip in mud, sand and loose rock | More road noise and slightly more rolling resistance |
| Slightly taller tire | More ground clearance and a larger footprint | Altered gearing, possible fender or brake clearance issues |
| Wider tire | Improved flotation in sand and soft ground | Heavier steering, potential rubbing at full lock |
| Smaller tire | Lower center of gravity, sometimes lighter steering | Reduced ground clearance and altered gearing |
If you change size, plan on a re-gearing or speedometer calibration check, and make sure your fender and brake clearance is adequate at full steering lock and full suspension compression.
Matching Tread to Your Riding
Tread choice matters as much as size. Mud-oriented tires have deep, widely spaced lugs that clear debris, while all-terrain patterns offer a balance of traction on hardpack, rock and loose dirt. If you ride mostly trails with some pavement or gravel road transitions, an all-terrain pattern usually gives the best overall behavior. For steady sand riding, look at paddle-style tires designed to float. Check the tire manufacturer’s terrain recommendations and read about tread geometry in our Mud-Terrain Tires and All-Terrain Tires articles to match design to use.
For a broader view of tire categories and how load ratings are calculated, the guide Off-Road Tires Explained: Types, Sizes and Load Ratings covers the fundamentals in more depth.
Setting Tire Pressure
Correct pressure is critical. Too high and the tire carries less of the ground contact patch, reducing traction and making the ride harsh. Too low and the sidewall can roll off the rim, the tire can overheat, and the risk of pinch damage rises. Use the owner’s manual pressure as your starting point, then fine-tune for terrain. Lower pressures in sand or mud increase the footprint, while slightly higher pressures on hardpack reduce rolling resistance. Always set pressures with the tires cold, using a quality gauge. If you ride with frequent pressure changes, a gauge, deflator and compressor kit makes the job faster; see Tire Pressure Gear: Gauges, Deflators, Compressors for an overview.
Installation and Break-In Tips
When mounting new tires, lubricate the bead with a tire-specific lubricant, not petroleum products that can degrade rubber. Seat the beads evenly and check that the valve stem is straight and centered. After installation, set the pressure to the recommended specification, then check it again after the first few rides. New tires may need a short break-in period to scrub off mold release before you ride hard.
Torque the wheel nuts to the specification in your owner’s manual, and recheck them after the first ride. Loose lug nuts are a common cause of wheel vibration and, in serious cases, wheel loss.
Common Mistakes
- Buying by tire width alone. Two tires with the same width can have different overall diameters and different rim fitments.
- Ignoring the load index. A lower load rating can overload the tire on a loaded rack or with a passenger.
- Going much larger without checking clearance. Rubbing at full lock can damage fenders and stress steering components.
- Running the wrong pressure. Using a car tire gauge with a low-range scale or guessing the pressure leads to inconsistent results.
- Skipping the speedometer recheck. Size changes alter the effective gearing and can make speed readouts inaccurate.
- Forgetting the spare or mismatched set. Keeping front and rear tires of very different tread depths can affect handling, so replace in matched pairs where practical.
Tips for Longer Tire Life
- Check pressure before every ride and after large temperature changes.
- Rotate tires if your model and tire pattern allow it, following the manufacturer’s directional guidance.
- Avoid sharp impacts with rocks and curbs, and slow down over obstacles.
- Store the machine out of direct sunlight, since UV exposure dries out rubber.
- Inspect sidewalls for cuts, bulges or cracks after hard riding.
Recommended gear
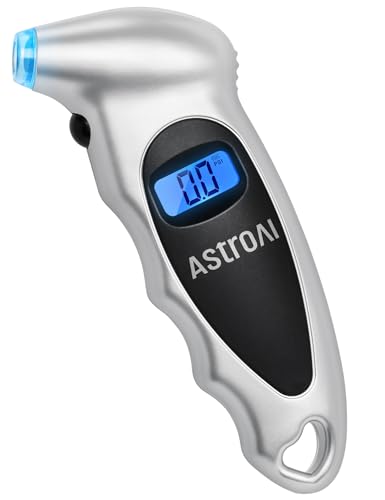
A quality digital tire gauge makes it easy to hit the exact pressure the manual specifies, and it helps you compare readings over time. Search for digital tire pressure gauge for ATV to find options sized for low-pressure off-road use. View on Amazon
A portable air compressor lets you restore pressure at the trailhead after airing down for sand or mud. Look for models rated for the tire volume you run, with an automatic shutoff. View on Amazon
A tire deflator quickly releases air to a set pressure, which is useful for repeatable low-pressure settings on the trail. View on Amazon
A tire bead lubricant formulated for rubber makes mounting new tires easier and reduces the risk of bead damage. View on Amazon
FAQ
Are stock Honda ATV tires the best choice for trail riding?
Stock tires are designed to balance handling, comfort and wear for typical use. For many riders on mixed trails, a well-chosen all-terrain tire of the same size works very well. Specialty riders in deep mud or sand may prefer a different tread pattern.
Can I use a larger tire than stock on my Honda ATV?
You can, but you should check fender and brake clearance at full steering lock and suspension compression, and expect changes to gearing and speedometer accuracy. Many owners make small size increases with careful checks rather than large jumps.
What does the load index mean on an ATV tire?
The load index is a code that corresponds to the maximum weight a tire can carry at its specified pressure. Your replacement should have an index equal to or higher than the original.
How often should I check my ATV tire pressure?
Check pressure before each ride, since tires lose pressure over time and temperature changes affect readings. Recheck after changing terrain, such as when airing down for sand or airing up for hardpack.
Do I need to replace ATV tires in pairs?
Replacing both tires on the same axle is strongly recommended, and matching the same brand and tread pattern on front or rear pairs helps keep handling consistent. Front and rear tires can be different sizes on some models, so follow the factory spec for each position.
Where can I find my exact tire size?
Read the sidewall first, then confirm with your owner’s manual or a Honda dealer using your VIN. Record the front and rear sizes separately.
Is it safe to mix tire brands on one ATV?
Mixing brands on the same axle is generally discouraged because tread patterns and compounds can behave differently. Keep front and rear sets matched in brand and pattern where possible, and consult a qualified technician if you are unsure about your specific setup.
Should a professional install my ATV tires?
Tire mounting and balancing can be done at home with the right tools, but a qualified shop with proper bead-seating equipment is a good choice for safety. If you are unsure about the process, consult a professional tire technician.
Conclusion
Start by reading the sidewall and confirming your model’s factory size, load index and rim diameter. Then decide whether stock sizing with a better tread suits your riding or whether a careful size change is worth the clearance and gearing checks. Keep pressures correct, torque the wheel nuts properly, and inspect the tires regularly. Following these steps will give you safer handling and longer tire life on any Honda ATV.